How To: Use External Data in Vensim
Epicenter directly simulates Vensim models, using a special Vensim engine. To use your Vensim model with Epicenter, it must be saved as a VMF binary file (file name ending in ".vmf").
Many Vensim models, in addition to the .vmf file, may also use external resources, such as spreadsheets or text files. When working with Epicenter, you can use external data in your Vensim models if that external data is saved in any of the following file formats: *.xls, *.xlsx, *.vdf, *.txt, *.tab, *.cin, or *.csv.
There are several steps to complete in order for this to work when you use your Vensim model in an Epicenter project. If you run into any problems, you can check the troubleshooting guide.
To use an external data file with your Vensim model:
Step 1. Save your external data in a supported format.
Step 2. Load your external data into your Vensim model using Vensim's GET DIRECT DATA method.
Step 3. Save your Vensim model as a .vmf file.
Step 4. Upload both your Vensim model (.vmf file) and your external data (for example, your .xls file) to the Model folder of your Epicenter project.
If you are using the current, Epicenter v2 APIs, that's all there is to it!
If you are using the older Epicenter v1 APIs, then in addition to uploading the external data to your project's Model folder, you also need to:
Step 5 (older Epicenter APIs only). Create and upload a context file (.ctx or .cfg file) to the Model folder of your Epicenter project.
Step 6 (older Epicenter APIs only). When you create a run in your project, pass in the files information for the external data in addition to the model information.
We'll walk through each step in the example below.
Example
Step 1: Save your external data in a supported format.
When working with Epicenter, you can use external data in your Vensim models if that external data is saved in any of the following file formats: *.xls, *.xlsx, *.vdf, *.txt, *.tab, *.cin, or *.csv.
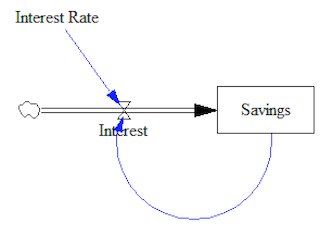
Our example model shows how a changing Interest Rate can affect your Savings. The external data is a *.xlsx file, here called data.xlsx, containing different Interest Rates for each step.

You can download the example spreadsheet here.
Step 2: Load your external data into your Vensim model using Vensim's GET DIRECT DATA method.
In this call, and working with a *.xlsx file, the parameters are:
- the name of the file
- the worksheet within the file
- the row in the file where the time step information is listed
- the cell in the file where the actual data begins
For instance, in our example spreadsheet, the call is:
GET DIRECT DATA( 'data.xlsx', 'Sheet1', '2' , 'b3' )Note that other similar Vensim methods (such as GET XLS DATA) DO NOT work with Epicenter.
Step 3: Save your Vensim model as a .vmf file.
Our example model shows how a changing Interest Rate can affect your Savings:
You can download the example model file here.
Step 4: Upload both your Vensim model (.vmf) and your external data to the Model folder of your Epicenter project.
For details, see more on uploading Vensim model files or the details on uploading project components.
If you are using the current, Epicenter v2 APIs, that's all there is to it! The Interface Builder uses the v2 APIs, so if you are working with that, you're all set.
If you are using the older, Epicenter v1 APIs, then you have two more steps. (For more information on Epicenter APIs versions, see Version History.)
Step 5 (older Epicenter APIs only): Create and upload a context file (.ctx or .cfg file), including a files object, to the Model folder of your Epicenter project.
The context file must have the same name as your .vmf file, for example, "My Model.cfg" and "My Model.vmf".
The context file must contain a files object (for .cfg files) or a mapped_files object (for .ctx files). In both cases, this object includes a key : value pair describing each external data file that is part of your project. The key can be any identifier ("data" in this example), and can even be used as an identifier in your model. The value is the file name of your external data file ("data.xlsx" in this example).
If you are using .cfg, an example of the body of the context file is:
{
    "files": {
        "data": "data.xlsx"
   }
}
If you are using .ctx, an example of body of the context file is:
{
    "mapped_files": {
        "data": "data.xlsx"
    }
}
After you have created the context file, upload it to the Model folder of your Epicenter project.
You can download the example context file here. (The example is "model.cfg", so unless your model is "model.vmf", you will need to rename it to match the name of your model file.)
See more on creating a Model Context file and uploading project components.
Step 6 (older Epicenter APIs only): Pass in a files object when you create a run for your project. The contents of this files object correspond to what you entered in the your model context file (Step 5).
For example, if you are using Flow.js, you might use:
Flow.initialize({
    channel: {
        run: {
            model: 'model.vmf',
            files: { data: 'data.xlsx' }
        }
    }
});
See more on working with Flow.js and customizing the Flow.initialize() method.
If you are using the Run API, you might use:
curl -X POST \
    'https://api.forio.com/run/acme-simulations/supply-chain-game' \
    --header 'Content-Type:application/json' \
    --header 'Authorization: Bearer eyJhbGciOiJSUzI1NiJ9' \
    --data '{"model": "model.vmf", "files": {"data": "data.xlsx"}}'
See more information on creating runs with the Run API.
Troubleshooting Guide
When you use the current, Epicenter v2 APIs, using external data in your model is really as simple as making sure that you load your external data into your Vensim model and then uploading both the data file and the Vensim model to your project's Model folder (Steps 1-4, above).
When you use the older, Epicenter v1 APIs, if you can create a run but you cannot advance the model / step the simulation, then double-check the following:
The name of the model context file (.cfg or .ctx) where you list the external file information must match the name of the Vensim model file (.vmf). For example, if your model is "My Model.vmf", then you must have a "My Model.cfg" or a "My Model.ctx" file in your Model folder.
In the model context file, note that:
If you are using multiple external data files in your Vensim model, they must all be listed in the
files(.cfg file) ormapped_files(.ctx file) object. For example, for a .cfg file:{ "files": { "data": "data.xlsx", "additionalData": "data2.xlsx" } }The names of the identifiers that you use, both in the model context file and in the run creation request, may not contain the underscore (
_) character.- The names of the external files are case sensitive when listed in the model context file. For example, if the file is "data2.xlsx", then listing "Data2.xlsx" in the model context file means that the file will not be found and you will not be able to advance the run.
The
filesobject must be passed to Epicenter when you create a run for your project — even though you have already included afilesobject (ormapped_filesobject) in your model context file. To create a run, see the example calls in Step 6, above.